

Outdoor Nordic curl setup: anchor and surface


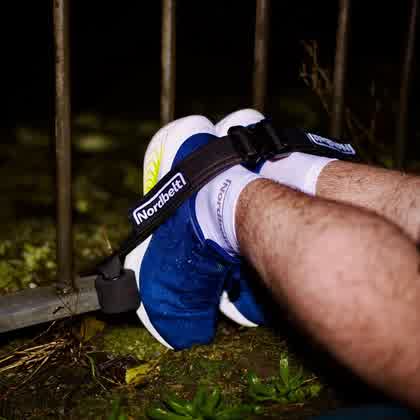
“Nordbelt is easy to secure and feels stable.”
An outdoor Nordic curl setup can be practical if the location meets four conditions: a suitable, immovable anchor; a flat, dry surface; clear space for your torso and hands; and conditions in which you can properly check the equipment and your grip. Do not choose a spot for its view or convenience alone. Test the fixed point and the ground before attempting a repetition, start with a short range of motion, and skip the session if rain, dirt, loose gravel or crowds make the setup unpredictable.
In brief
A good outdoor location is uneventful and predictable: the anchor does not move, the mat lies completely flat, your knees are protected, and you can place both hands down early without hitting a kerb, bench or sports bag. A fence may look usable, but it is only an option after you have checked its construction, the attachment, permission to use it and the immediate surroundings. A wet or rusty section, a loose panel or a sharp edge is a reason to stop.
Use the same gradual progression outdoors as you would indoors. The Nordic hamstring curl demands substantial eccentric control; research programmes increase the load and range of motion gradually instead of starting with a full repetition (Medeiros et al., 2020; Petersen et al., 2011). That principle does not change outdoors. The location simply adds variables that you need to reassess before every set.
Choose your outdoor Nordic curl setup first
Walk through the area before unrolling your mat. Start at the anchor and then look straight ahead. You need room for three zones:
- Anchor zone: enough space to position the attachment low, straight and away from sharp edges.
- Kneeling zone: a flat surface where the mat will not rock, fold or straddle two different surfaces.
- Braking and catch zone: clear space where your hands can land early on the same surface.
Also consider what could change during your set. A gate may open, cyclists may pass and the edge of a sports field can become busier. Choose a place where you will not block a route and where nobody needs to pass the anchor or your mat unexpectedly. If only a narrow strip is available, use the measuring method in the guide to a Nordic curl setup for a small space, but do not let limited space become a reason to accept obstacles.


What setup do you need for a stable Nordic hamstring curl?
If you also want to add Nordic curls at home without a training partner or large fitness machine, Nordbelt provides a repeatable setup with stable ankle fixation. You can move that established home routine outdoors only when the chosen anchor, surface and clear catch area are suitable. The limitation is therefore clear: a compact training aid does not make a loose fence, wet surface or cramped location safe, and it does not replace sound technique, anchor checks or gradual progression.
The broader choice between a door, bench and other fixed points is covered in the existing guide to doing a Nordic hamstring curl at home. Outdoors, the decision is not about having more variations but about finding one repeatable location that you can inspect every time.
Take your Nordic curl from the first rep to week 10.
A concrete 7-page plan: build up week by week, without pushing too fast.
- 01A clear week-by-week progression
- 02Technique and the mistakes to avoid
- 03A simple log you will actually use

≤51%
✓Backed by research
Meta-analysis of randomised trials of the Nordic Hamstring Exercise.
Open the download page again or check the email we sent you.
Open the download page ↗Nordic curls on an outdoor fence: how to assess the anchor
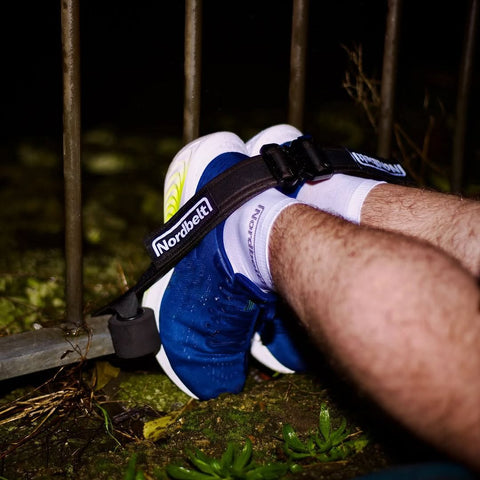
Never assume that a fence is automatically a training anchor. First check whether the component is structurally fixed and designed to bear a load. Do not use a decorative panel, loose bar, moving gate, thin mesh or any element with play. Use public property or someone else's property only with permission, and follow the installation instructions for your own setup.
Then perform a manual check without kneeling:
- inspect the base, connections and bars for movement, damage, rust and sharp edges;
- position the attachment low and straight, without rubbing it over a rough corner;
- first pull gradually with both hands in the direction in which you will later apply the load;
- stop as soon as the fence, attachment or contact point shifts, twists or makes a noise;
- make sure that no door, path or person behind the fence is obstructed.
An anchor that seemed firm yesterday needs to be tested again today. Moisture, use by others or a loose connection can change the situation. Avoid improvised fixes intended to make an unsuitable fixed point work anyway.
What outdoor surface works for Nordic curls?
The best surface is flat, dry, clean and sufficiently grippy to keep the mat in place. A level sports surface or flat patio can be practical if there are no loose particles, puddles, edges or changes in height along the movement path. Keep the entire kneeling and catch zone on the same surface.
Grass requires extra caution. It may be uneven beneath the mat, conceal holes and become slippery after dew or rain. Check the ground with your hands and feet, and avoid any spot that springs, slopes or shifts. Loose gravel, sand, mud and a transition between paving and grass are unsuitable for a controlled hand catch.
Before the first repetition, place your hands at the furthest point of your planned short range. If one hand is lower, the mat wrinkles or your palm slides, adjust the location or train somewhere else. You can find more technique guidance in the overview of common Nordic curl mistakes.
Weather, moisture and temperature: when should you skip the session?
Rain changes several conditions at once: the surface may become slippery, dirt adheres to equipment more readily and your hands have less reliable grip. Do not continue simply to finish a planned set. Dry the components, check them again and choose a dry location or another time.
Also watch for condensation, dew, mud and wet metal after the rain has stopped. A visibly dry upper section tells you nothing about the ground beneath the mat or the low contact point. In strong winds, the mat must remain completely flat and loose items must not blow through the catch zone. In heat or freezing conditions, follow the equipment's instructions for use and storage; do not use any component that feels stiff, damaged or deformed.
Test the outdoor location in five controlled steps
Make the location check a standard routine:
- inspect and load the anchor with your hands first;
- lay the mat flat and press down its edges;
- kneel, adjust the ankle fixation and check that both feet are level;
- lean forward a few centimetres and place your hands down early;
- increase the range of motion only if the anchor, mat and catch zone remain unchanged.
Stop after any shift and repeat the check; do not compensate by moving faster or placing your hands down later. A manageable, repeatable progression is more valuable than a single maximal attempt. Research into the implementation of Nordic programmes highlights the importance of feasibility and adherence alongside the exercise prescription itself (Goode et al., 2015; Ripley et al., 2021).
Transporting and storing a portable outdoor Nordic curl setup
Taking a portable Nordic curl setup outdoors starts at home. Pack the components when they are dry and clean, keep small attachments together, and bring a knee mat large enough for your kneeling and hand zone. Use a bag for transport, not as padding beneath an unstable mat or as an improvised anchor.
After the session:
- remove visible dirt from the strap, attachment and mat;
- allow damp components to dry completely before storing them in a closed bag;
- check contact surfaces for wear or damage;
- roll straps loosely without sharp bends;
- store everything together in a dry place for the next indoor or outdoor set.
For precise assembly and component checks, use the Nordbelt how-to guide. This secondary route shows how the setup is used, but it does not change the requirement for a suitable outdoor anchor and surface.
Common mistakes when training outdoors
Choosing the nearest fence
Distance is not a quality criterion. Assess the construction, permission, low attachment point, edges and movement space before unpacking your equipment.
Pulling only on the strap
A strong strap tells you nothing about the fence, contact point or ground. Test the entire chain in the actual direction of pull.
Kneeling and catching on two surfaces
A mat that lies partly on paving and partly on grass can tilt or slide. Keep the anchor, kneeling and catch zones on one level surface as far as possible.
Using the first repetition as a test
Check the anchor and hand placement while you are not fatigued. Only then should you start with a short range. The general guide to the Nordic hamstring curl and its regressions can help if you have not yet mastered the exercise itself.
Packing damp equipment straight away
A closed bag hides moisture and dirt until the next training session. Clean, dry and inspect the equipment first, and only then put it away.
Frequently asked questions
Can you train Nordic curls outdoors?
Yes, if you have a suitable fixed anchor, a flat and dry surface, knee protection and a clear catch path. Test the entire setup before every session and start with a short range of motion. If you are unsure about the anchor, grip, permission or surroundings, choose another location or train indoors.
Is every fence suitable as a fixed point?
No. Loose mesh, decorative panels, moving gates, damaged bars and components with rust, sharp edges or play are unsuitable. You also need permission to use the object. Always follow the instructions for your setup and stop if the structure or attachment moves.
Can you do Nordic curls on grass?
Only if the grass is dry, flat and firm, and the mat does not slide or cover hidden holes. Check the entire kneeling and catch zone. When there is dew, mud, a slope or uneven ground, a flat, dry sports surface or an indoor location is the better choice.
What should you do with the setup after rain?
Stop the session, remove dirt and dry all components. Check the strap, attachment and contact surfaces for damage or deformation, and allow damp parts to air-dry completely before storing them. Resume only at a dry location that you have tested again.
How do you transport a portable Nordic curl setup?
Keep the strap and small components together in a bag, bring a suitable knee mat, and pack only clean, dry equipment. On arrival, assess the new anchor and surface from the beginning. Portability makes a setup easier to transport; it does not automatically make it suitable for every location.