Band-assisted Nordic curl: how to set it up

A band-assisted Nordic curl uses an elastic band to support your upper body as you lower forwards. Your ankles remain secured separately at a low anchor. Attach the assistance band to a suitable high anchor behind you and position it around your chest, away from your neck. Choose enough assistance to control the movement, keep your hands free to catch yourself and check both attachments before starting.
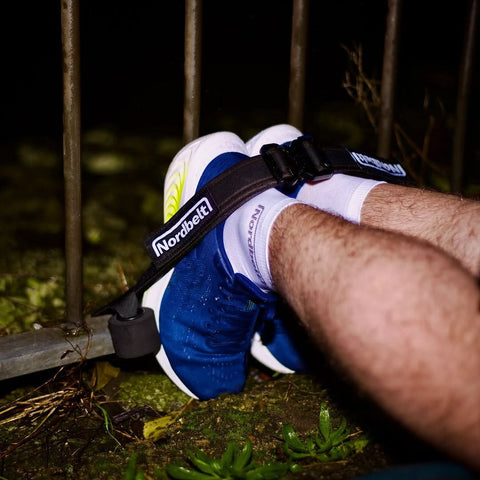
For the low ankle attachment, Nordbelt for Nordic curls at home can be a practical option with a suitable door, workout bench or sturdy fence. That attachment holds your lower legs in place; elastic chest assistance requires a separate, suitable high anchor. An ankle strap is not a resistance band and cannot make an unsuitable attachment safe.
What does the assistance band do?
Kneel with your ankles secured and lower your body forwards from your knees. Your hamstrings work to slow the movement. The band supports your upper body so you can find a version that lets you maintain control for longer. More assistance is an adjustment to the exercise, rather than a failed repetition.
This differs from a leg curl in which an elastic band pulls at your ankles and you bend your knee against resistance. In an assisted Nordic, your ankles stay in place while the band helps support your torso. A Nordic curl with hand support also works differently: your hands provide some of the assistance. Even with a band, keep your hands available for a planned catch.

Illustrative image of a shallow assisted lowering movement using generic equipment. This is not a product photograph or evidence that a particular home setup is safe.
Assistance has been studied as a way of modifying the exercise. One study compared assisted and unassisted Nordics in sixteen male sprinters performing three sets of three repetitions. Under those test conditions, assistance produced, among other findings, a greater controlled range and less decline between repetitions. This does not establish that every home band provides the same assistance, prescribe a universal programme or test this ankle-attachment product. See Alt et al., 2024.

Two attachments need two separate checks
Assess the low ankle fixation and the high chest assistance separately. A secure low attachment tells you nothing about whether the high anchor is suitable.
| Part | Purpose | Check before exercising |
|---|---|---|
| Low ankle fixation | Keeps the lower legs in place | Attachment does not move; knees are supported; pressure around the ankles is tolerable |
| High anchor and assistance band | Support the upper body | Anchor is intended for this load; band is undamaged; attachment cannot come loose |
| Space in front | Allows a planned catch | Hands can reach the floor freely; the movement area is clear |
Follow the manufacturer's instructions for both the anchor and the band. Do not simply tie the band to a door handle, loose furniture or an arbitrary railing. A door, bench or fence suitable for low ankle fixation is not automatically a suitable high band anchor. If you cannot establish suitability, choose another setup or have it assessed first.
The setup guide describes the existing low-attachment options using a door, workout bench, or fence or beam. Use only the option that fits your situation. Also check that the mat cannot slide and that there is enough room to place your hands on the floor.
This attention to setup reflects a limitation of the research. A review of Nordic studies identified incomplete reporting of factors including fixation, knee position and execution. The practical lesson is to record these conditions deliberately; the review does not certify a particular home setup or brand. See Alt et al., 2022.
Adjust assistance without guessing from band colour
Do not choose solely by the band's colour or stated weight rating. The assistance you feel also depends on its length, stretch and direction of pull. A colour used by one brand is therefore not a useful prescription for another brand's band.

Illustrative preparation image: inspect the unloaded band and follow the manufacturer's limits. The image does not establish its load capacity.
Start upright on your knees. Position the band around your chest at breastbone level, away from your neck and face. You must be able to breathe freely and move your arms. Arrange the setup so the band provides assistance from the start without unexpectedly pulling you backwards or upsetting your balance. Stay within the manufacturer's conditions of use.
Make a small trial movement with your hands ready for the floor. Can you slow and stop the descent yourself? Do the anchors, band and knees stay in place? If the band pinches, an attachment shifts or you feel an unexpected jerk, stop and adjust the setup. You do not need a full descent for this initial check.
Take your Nordic curl from the first rep to week 10.
A concrete 7-page plan: build up week by week, without pushing too fast.
- 01A clear week-by-week progression
- 02Technique and the mistakes to avoid
- 03A simple log you will actually use

≤51%
✓Backed by research
Van Dyk et al., 2019: meta-analysis of programmes with NHE. Not an effect test of Nordbelt or this protocol.
Open the download page again or check the email we sent you.
Open the download page ↗Lower with control and catch yourself
Keep your torso and thighs as closely aligned as possible and move from your knees. Do not let the band pull you into a different position. You do not have to reach the floor for a useful repetition: choose the part of the movement you can perform calmly.
Bring your hands forwards in time and catch yourself with control. Use them to help return to the start if needed. Do not assume the elastic band will automatically pull you upright. As you return, check that the band stays around your chest and the ankle attachment has not shifted.
If you suddenly accelerate, reduce the range or choose suitable additional assistance. End the set when you cannot repeat the movement with control. Do not use extra assistance as a solution to sharp pain, a sudden pulling pain or worsening symptoms. Discuss persistent symptoms or returning after a hamstring injury with a doctor or physiotherapist.
When can you reduce assistance?
Start with a repeatable setup. Note the band you use, high-anchor location, kneeling position and how you catch yourself. Next time, this helps you distinguish a change in execution from a change in the setup.
Once you can repeatedly lower and catch yourself calmly in the same setup, cautiously try one adjustment: slightly less assistance or a slightly greater controlled range, for example. Do not change the band, anchor height, distance and training volume together; you would not know which change made the exercise harder.
Reassess control afterwards. Less assistance is not a compulsory goal for every session, and a deeper repetition alone does not prove increased strength. If you accelerate or your position changes, return to the last workable setting. This is a practical framework for execution, not a validated strength measurement or personal rehabilitation protocol.
If you have no suitable high band anchor at home, read the basic home Nordic curl setup guide. A simpler suitable variation is more useful than an improvised, unreliable anchor. For a broader comparison, see other ways to adapt the Nordic curl.
Frequently asked questions
Can the same band secure my ankles and support my chest?
Treat these as separate functions. The low attachment holds your lower legs in place; the assistance band supports your upper body from a high anchor. Use each product only as intended. Converting ankle-fixation equipment into a chest band or high anchor is outside this guide.
What band strength do I need?
There is no universal colour or kilogram rating for this setup. Within the manufacturer's limits, choose a band that allows controlled movement, free breathing and a controlled catch. Body dimensions, band length, distance and anchor position make a standard recommendation based only on colour unhelpful.
Is more assistance better than a shorter movement?
That depends on what you can control and the setup available. Both can modify the exercise, but they change different things. First find a workable version, then adjust one element. This article does not establish that either choice produces better training results for everyone.
Can I use this variation with a hamstring injury?
An assistance band does not automatically make a Nordic suitable for an injury or a particular recovery stage. Do not use this article as a rehabilitation programme. If you have current symptoms or are unsure about returning, seek an assessment of appropriate loading. Setup and assistance cannot replace that assessment.